Monday, 20 July 2015

... finding Shaun the Sheep

We were in Wiltshire at the weekend as my daughter was racing at the Castle Combe Circuit on Sunday, we made a weekend of it and rented a cottage just outside of the beautiful National Trust Village of Lacock. It is often used by Film and TV companies as it's honey stoned period houses are the epitome of the quintessential English village, when we dropped in on Monday morning they were preparing sets for a SKY TV drama/comedy/crime show called Agatha Raisin can't wait for it to come out as the one they aired around Christmas last year was excellent.

We spent Saturday in Bristol and took advantage of two free events that were going on in the city that day, the Harbourside Festival which was a series of community based events on and around around the harbourside area. The second was Shaun in the city where 70 large Shaun the sheep characters have been placed around the city, all have been customised by various artists and organisations, they are free to view and get your photo taken with them, there is an app to help you round or there are free printed maps from the tourist information.  They will be making an appearance in London in September at Covent Garden along with 50 that have already been on display in the capital giving you the chance to see all 120 of them together, this is for a very limited time only and then they will be auctioned off.  All proceeds from the Bristol sheep go the Bristol Children's hospital Grand Appeal and the funds from the 50 London sheep go to the Wallace and Gromitt's Children charity that supports children in hospital throughout the UK


LACOCK VILLAGE


SHAUN IN THE CITY


BRISTOL HARBOURSIDE FESTIVAL


I hope you all had a good weekend, let me know what you got up to

Tuesday, 14 July 2015

....homemade bias binding

In preparation for making my walkaway dress I have given myself the task of using homemade bias binding.  I have researched this and it seems pretty simple provided you have the correct kit.  I brought a package on e-bay that contains 4 different sizes of guides, an awl (a pointy tool to help the process get started) and a special foot for my sewing machine that helps the bias to be attached more easily (so far untried)

www.snadralovesblogging.com
Preparing to make bias binding


When making bias binding you need to cut strips of fabric across the grain of the fabric so the selvage edges are top and bottom and you are cutting from corner to corner across  the fabric.  When it is cut this way it is "stretchy" and has more give so that it can go round corners like necks and armholes easily.

The strips need to about twice the size you want your binding to be, eg if you want 1/2 inch binding you cut a strip about 1 inch wide, when it is fed through the guide you will get a 1/4 inch fold on either side and a face of 1/2 inch.


There are two methods that I have found, the strip method where you cut a square of fabric, draw diagonal lines across at your chosen width, you cut the strips and then sew the ends together to create a continuous ribbon of fabric.  This is then fed into the guide and very importantly ironed to keep the folds in place.  The thing to be aware of is that the smaller the piece of fabric the more joins you have in your binding.  I found this on Pinterest that illustrates this method.


The second method is the continuous strip method that involves cutting a square into two triangles sewing them up to to make a parallelogram, marking up your strips across the bias, sewing the whole thing together but lining up the bottom of the first strip with the top of the second strip.  I don't know how but it works but you get a long strip of fabric ready to feed into your guide.

I watched a couple of you tube videos and then found  this illustration on Pinterest which was very helpful.  There is a wealth of tutorials and guides on this subject as it the method used by quilters to finish the edges off their quilts.


Creating Continuous Bias


My top tips for making bias binding


  • Make a small investment and buy the necessary kit, you can make it without but it is hard work 

  • Have a practice first on a  spare piece of fabric so that you are confident in what you are doing

  • Spray starch your fabric once you have cut the square out, it will help the binding to keep it's shape

  • Iron like a mad thing

  • Make sure you work on the bias and not across or you will just end up feeding the bin! yes I did bodge it up


It is time consuming but I am hoping to reap the rewards when I put the finishing touches to my walkaway dress.


What do you think? would you make your own or grab a pack of ready made?


Saturday, 4 July 2015

.....the vintage sewing pattern pledge 2015

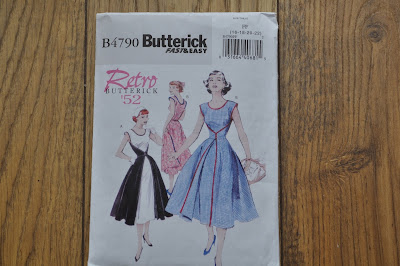
My next sewing projects is a reproduction vintage pattern from the 1950's, it is the famous Walkaway dress as featured in the Great British Sewing Bee series 3.

It is alleged that you can start this dress in the morning and walk out in it to lunch, however, I have read the instructions that include  "Step 9, Allow 24 hours before hemming to permit bias to set" so I will not be lunching with the ladies in it today.


http://snadralovesblogging.blogspot.co.uk/
Walkaway dress pattern


I saw this as an ideal opportunity to take part in a blog challenge, as I have been following Marie at a stitching odyssey the vintage sewing pattern pledge seemed perfect.  This is co-run by Maria and Kerry at Kestrel makes and the idea is encourage you to sew either a vintage pattern if you are lucky enough to have any available or a reproduction one.


The beauty of this challenge is that you can start at any point through out the year and you make a pledge that is personal to you.  Mine is to make two reproduction retro patterns before the end of the year, however, as I am planning to wear them at the Goodwood Revival weekend in September mine should be completed in less than 9 weeks eek!  I hope I haven't bitten off more than I can chew!


“the


If you are planning to sew any vintage patterns do think about joining the challenge and if you need some inspiration take a look at what has already been achieved on this Pinterest board


Do you have a favourite vintage pattern? and have you been brave enough to make it up?


Friday, 3 July 2015

....a summer evening in my garden


With temperature rising and the house hotter than an oven there is only one thing to do and that is to decamp into the garden


Hubby had the BBQ in full swing when I got home from work so no cooking for me


Followed by freshly picked strawberries for pud


and a feast for the eyes with the roses in full bloom


Enjoy it while it lasts there are thunderstorms predicted for tonight.


I have sewing plans for the weekend that involve  5 yards of fabric!!  I am feeling slightly light headed at the prospect.  Are you planning to sew or do you have other weekend plans?


Tuesday, 30 June 2015

... Daisy Daisy

After much deliberation and with the benefit of a small windfall I have made the bold step of buying a dressmakers dummy. The idea to have one has been in my head for a while and when I was struggling with the fit on the blue camisole Sandra D suggested this would be helpful.


 I did look into the idea of the famous duct tape DIY bodyform, this blog from offbeatbride has step by step instructions. and there are plenty of others versions on Pinterest.  I read a few and it was  helpful as it highlighted a few things I hadn't thought about, mostly the stability and durability of it, also that duct tape isn't the best thing for sticking pins into.  If your body shape changes then you have to start all over again


Buy Adjustoform Lady Valet Mannequin Online at johnlewis.com


I was originally looking at this model from John Lewis at a cost of £199.00, all the reviews were very positive, however I found the same thing for £149.00 at sewing online via eaby, the only difference being the colour of the wood, which I didn't feel was worth the additional 50 quid.  I now need to make her resemble my shape as much as possible, I read somewhere that you should use an old bra and fill it to make it more lifelike, I must admit that in her current state I would defiantly need a boob job as she is very pert!


I have named her Daisy Daisy as the car I followed out of the retail park  when I picked her up had stickers on the back of two daisies.  She has had a mixed reception at home, hubby thinks she is a little bit creepy and has popped his holiday hat on her as he finds her less "spooky" with it on.

 I have been inspired to write some new words to the classic Daisy Daisy song

Daisy, Daisy help me to make clothes do
I'm half crazy trying to fit things without you
I can't make a stylish dress
In fact its a bit of a mess
But you'll look sweet and very neat when I have fitted my dress to you.

Yeah sorry about that!

I would love to hear if you have had any adventures in making your own body form or if you have any advice on how to get the best out of Daisy.


Tuesday, 23 June 2015

..... Red spot and blue check - New look 6035

I was a very busy bee before my holidays, I wanted to make a sleeveless top to take with me, this was in my sewing wardrobe plan and I had allowed for this when I was working out what clothes to take with me.

http://snadralovesblogging.blogspot.co.uk/
Red spot and Blue check


My initial idea was to make the famous Collette Sorbetto top, this a free to download pattern and has been around for a few years so there are plenty of examples out there in internetland, Pinterest is a rich source of reference. People have got very creative with the basic pattern and made some amazing additions and alterations but I was content to just go with the basic model. It was my first downloadable pattern and I must confess that I approached this process with trepidation, however, it was far easier than I had expected and I would have no hesitation to purchase downloadable patterns in the future. I cut it out in the red spotted fabric I brought from Abakhan fabrics a few weeks ago, and did a quick pin and try but I wasn't happy with the fit, I think a full bust adjust is probably needed so I have put it to one side for now. This top calls for bias binding so I had indulged in the necessary kit to make my own so I will have to find another excuse to have a play with that.


http://snadralovesblogging.blogspot.co.uk/
Colette Sorbetto download


In my pattern stash I have New Look 6035, I brought this pattern after seeing it on the Great British Sewing Bee, it was used by Lauren of guthrie & ghani  .  The downside of this pattern for me is that the largest size is a 16 and I think an 18 is the right size for me, I have made the skirt from this pattern last summer and just added a bit a couple of centimeters  to it when I cut it out and adjusted the seams allowance to get the right fit.  With the top I cut out the size 16 and sewed a 1cm seam rather than 1.5cm  giving me a little more room. There are no fastenings on this so it is really straightforward, gather the neck at the front, sew the shoulder and side seams, finish the hem and the small splits at the side, the neck and arm openings are self bound.


http://snadralovesblogging.blogspot.co.uk/
Red Spot New Look 6035


I used the remaining red spotted fabric as I just love this fabric and I am disappointed that the photographs haven't quite captured the true colour.  I could have completed it in a day if I hadn't been distracted by the family and my need for tea!   It reminds me of a top my Mum had when I was a kid in the 60's but hers was made in seersucker and as I have some blue checked seersucker in my fabric bag it seemed rude not to give it a go.  This time I was sewing after work and it took me just three nights to complete, I think the fit on this top is slightly better than the red spot which I put down to the seersucker being a little softer.  It is my first time working with seersucker and I would definitely  be happy to use it again, however, I would use pinking shears as the fabric is slightly more prone to fraying than the poplin I used.


https://www.pinterest.com/sgilbert59/sew-and-sew/
1967 catalog model


The simplicity of this pattern and the speed which I was able to complete it makes this perfect for a novice sewer like myself, it has given me a bit of confidence that I can produce wearable garments in a timely manner.  Admittedly the fit isn't 100% perfect but I wore the blue top to work a couple of days before I broke up and got a couple of compliments from my colleagues and both were worn on holiday with pride.  I just need some warm weather and I will be wearing them again.


So which do you prefer the look of Red Spot or Blue Check?


Sunday, 21 June 2015

... further adventures with New Look 2373

Round of applause please I have a dress that I made all by myself.  I was able to give over a whole weekend to making this and I am really please with the result, which is a bit of a boost following on from the disappointment of the camisole top,

http://snadralovesblogging.blogspot.co.uk/


The familiarity of having already made the pattern gave me quite a bit of confidence and I was much quicker this time round.  I did not spend so much time hanging round in my bedroom looking into the mirror with bits pinned on which probably helped to speed up the process.

I was worried that there is still a bit of gapping at the side and I think I should have made the straps slightly shorter but having worn it these are minor problems that only I was aware of. I am thrilled with the way it has turned out, it is exactly what I envisioned.

http://snadralovesblogging.blogspot.co.uk/


The fabric was nice to work with although it was quite difficult to tell which was the right side ( it had a little sticker on it when it came from Abakhan fabrics) but I figured if I had got it wrong anywhere and couldn't tell then no one else is going to notice either.  It washes and irons really nicely and I just need some nice weather so that I can get some wear again now I am back from my holidays. The photos are courtesy of lovely husband taken in Lanzarote.

A quick update on the beleaguered camisole top, I used the colour run rescue pack and it did get rid of the loose dye, however, it also faded the ric-rac colour and the fabric has shrunk slightly making the fit a little snug.  I will wear it around the house and garden  but it just seems that this garment was not fated to be successful.

Are you sewing anything for your holidays?